All our hack are belong to us.

Active projects and challenges as of 22.01.2025 13:39.

Hide full text Print Download CSV Data Package


In pursuit of fair co-creation

A handy hacky flowchart for hackathon-goers-to-be.


~ PITCH ~

What is a hackathon? Every year, hundreds of these events pop up on weekends across the country. From corporate innovation experiments to chaotic co-creation jams, from competitive coding to cooperative maker events, from protected IP to open license models, there’s a hackathon for everyone’s taste. And yet, despite being labeled under the common "hackathon" name, their goals vary greatly. Since hackathons are used as a means for work precarization and free labor, the ambiguity of expectations brews potential misunderstanding among participants and stakeholders.

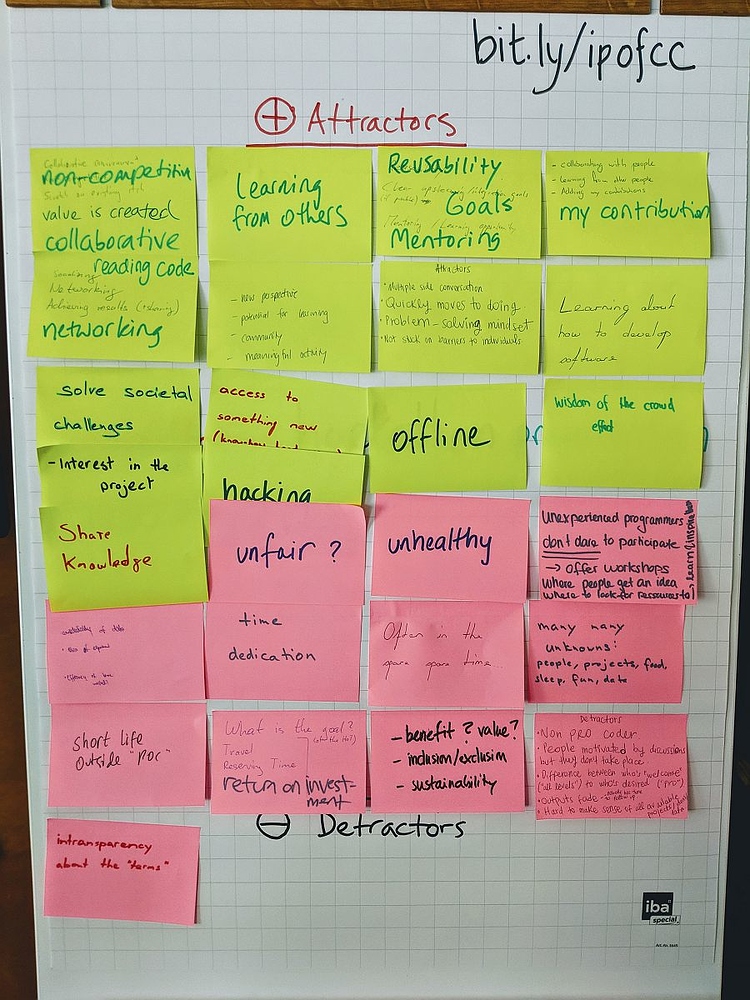
During the workshop on fair co-creation (online notes) at #DINAcon18, we discussed time-bounded collaborative events like hackathons common to many technical communities. With the workshops participants we built - in a collaborative manner - a list of attractors and detractors for participation in hackathons. This inspired us to, during #hacknight, start putting it together into a flowchart based on this list.

The flowchart is a playful* way to describe the metadata that we believe should be exposed by every hackathon in order to provide fair conditions to decide attendance. It may help guide potential hackathon participants about whether they should join or not a specific event, help hackathon organizers consider some of the issues at hand, or just amuse or confuse people.

(*) inspired by the cheeky and insightful flowcharts of the xkcd web comic

Poster

Download: JPEG PDF or SVG

Prototype

Full screen

Workshop

Photo of the post-its collected at the DINAcon workshop.


biocade


~ README ~

BIOCADE

This is an attempt to create a simulation of cell interactions during the DinaCon Hacknight. We started with a simple physics simulation trying to emulate brownian motion, heavily based on arcade's example code.

Environment

  • arcade - python game framework
  • pymunk -python physics engine based on chipmunk

To get started, you should be able to:

pip install -r requirements.txt
python3 main.py

Things to do

This being a hackathon project, there's a lot of things to still do:

  • parameterize
  • break out common properties of shapes & sprites into a class hierarchy
  • hook into pymunk's collision detection logic and actually apply molecular properties (e.g. different interaction based on an instance's properties).

LibreOffice

A fun end-user project that is easy to get into.


~ PITCH ~

LibreOffice is a fun project that welcomes everyone. We provide a series of easy tasks to get working on here: https://wiki.documentfoundation.org/Development/EasyHacks/by_Required_Skill

Since it takes so long to build LibreOffice - we provide easy-to-use VM's with pre-built source trees - so that you can get going ~immediately. See me (purple T-shirt) to get an ssh key with more details here:

https://wiki.documentfoundation.org/Hackfests/VMs/Using_a_VM

A list of some simple tasks that might be fun:

Killing some now un-needed dead code and testing ... as per description in: https://bugs.documentfoundation.org/show_bug.cgi?id=120243

Avoid writing configuration potentially several times during startup: https://bugs.documentfoundation.org/show_bug.cgi?id=92529

Calc: add drop-down on sum button: https://bugs.documentfoundation.org/show_bug.cgi?id=120697


Challenges

openki

A tool to build up and organize local communities


~ PITCH ~

Openki - a peer to peer school where everyone can learn from others. Openki supports the growth of active local communities which meet regularly through self-organized courses. It makes education a collective experience of everyday life, self-organized, participatory, inclusive, and fun.

https://vimeo.com/128546529


{ hacknight challenges }

Use OpenKI to sign up for or even to propose a new course in your area. The easiest way to do this is at openki.net

Use the GitLab repository to respond to one of the open issues. Or try one of the advanced features, like InfoScreens, Frames or Calendar Export, and submit feedback to the dev team on your experiences.

Install your own OpenKI server, and see how far you get along in the code!


Stu's Images - CC BY-SA 3.0

~ README ~

Openki

Platform for open education – Free software built with Meteor.js and React

An interactive web-platform to provide barrier-free access to education for everyone. Openki is a simple to use open-source tool for local, self-organized knowledge-exchange: As a foundation for mediating non-commercial education opportunities, as interface between people who are interested in similar subjects, and as an instrument which simplifies the organization of “peer-to-peer” sharing of knowledge.

arrow diagram showing connection between individuals, comunities, event-locations and calendars

Beside the longterm public installations, Openki can be used at unconferences, BarCamps as well as in democratic schools and participatory festivals. [ read on...](https://about.openki.net "our blog")
(★ Star us if you like the idea)

Use or try it

Live: openki.net
Demo / playground: sandbox.openki.net
Pre-release: dev.openki.net


Features

Frontend: - :pencil: Easily propose topics and events - :speechballoon: Simple discussion board per course - :mortarboard: Extendable participant roles - :cat: Categories with sub-categories - :roundpushpin: Regions and venue system - :whiteflower: Groups-, community- and program functionality with filters

Integrations: - :computer: Multiple kiosk screen views with upcoming events (docs) - :pager: Iframe-URLs to dynamically embed views into other pages (docs) - :date: Calendar and iCal exports (docs) - :key: Single-Sign-on (OAuth: Facebook, Google, GitHub...) - :ideographadvantage: I18n: GUI for crowdsourced translation (using Weblate) (docs) - :electricplug: JSON API, read-only (docs)

Further: - :envelope: E-mail notifications - :mailbox: Private messaging - :openfilefolder: File upload - :mag: Fulltext-search - :iphone: Responsive design - :bar_chart: Statistics and evaluation - :door: multitenancy (internal, private usage) - :ghost: Customizability, some white labeling

Intended features

  • :whitelargesquare: White-labeling per groups, organizations and regions
  • :chartwithupwards_trend: Visual statistics
  • :closedlockwith_key: More privacy settings
  • :heavycheckmark: Voting-/polling-system, fix-a-date schedules
  • :iphone: Smartphone App
  • ...see more in our issues.
    Please upvote new features you would like to see or propose new ones.

Contribution

Code submissions are welcome. To submit a change, fork this repo, commit your changes, and send us a merge request.
In the interest of having an open and welcoming environment for everyone, we agreed on our Code of Conduct. By participating in this project you agree to abide by its terms.

Installation (Linux, OSX and Windows)

  • To install Meteor locally, run: curl https://install.meteor.com | sh (or download the installer for Windows)
  • Download and unzip or https://gitlab.com/Openki/Openki.git Openki into /some/path.
  • cd /some/path/Openki
  • meteor npm install (sometimes twice)
  • Run meteor npm run dev (We support server side debugging. For help, see: https://nodejs.org/en/docs/inspector)
  • Browse to localhost:3000 -> done.

Admin user is called greg with pass: greg, any other visible user has pass greg as well. Further reading in our wiki

Running the tests

Run tests with: meteor npm run test meteor npm run test-live meteor npm run app-test

Add --grep=<pattern> at the end to only run tests that match the pattern. eg. meteor npm run test-live --grep="Propose course via frame"

Note: To run the app-tests, you need a chromedriver binary. On Debian, you can get one with apt install chromuim-driver. Also make sure to run meteor npm install.

Run linters and type check with these commands:

meteor npm run type-check
meteor npm run es-lint
meteor npm run sass-lint

Run auto formatting

Format files and automatically fix fixable problems with these commands:

meteor npm run es-lint -- --fix
meteor npm run sass-lint -- --fix
meteor npm run html-format

Note: We use typescript and eslint with prettier for *.js files, stylelint with prettier for *.scss files and beautify for *.html. You can install their extensions in your IDE to automatically execute the formation when saving.

Fixing weird errors

In case you get weird errors when starting (eg. error 14) try this command:

meteor npm run reset

Documentation

  • The technical documentation is here on GitLab in the :book: Wiki
  • More documentation can be found on our blog

Contacts

Help translating

To help translating, please visit our our translation guide.

Graphical translation status box from Weblate

License

  • AGPL – GNU Affero General Public License 3.0

  • Created: 19.10.2018 by Mannshoch
  • Updated: 19.10.2018
  • Progress: 20% (Challenge)
  • Permalink

Konsole neu gedacht

Linux Essentials - mit modernem Touch


~ PITCH ~

Stelle dir vor du startest einen Raspberry-Pi am Fernseher und du landest in der Konsole. Was tust du als nächstes? Du kniest vor den Fernseher und suchst unten links in der Ecke, in kleinster Schrift die Konsole ...und findest nur die Ausgabe der Konsole weil die Eingabezeile im Overscan-Bereich des Fernseher verschwunden ist.

Mit dieser Aufgabe wollen wir ein paar Probleme der Konsole angehen.

Sämtliche Basisbefehle die einfach jeder kennt und überall verwendet werden basieren auf Steinalten aber stets gewartetem Code. Nehmen wir uns doch die Freiheit und denken diese Werkzeuge neu. Ein Beispiel gefällig?

Kennst du https://hyper.is ? Diese Anwendung kombiniert die klassische Shell mit modernen Techniken.

Klassische Terminal Konsolen haben noch immer einen Ausgabebereich und besitzen eine Eingabezeile für Befehle diese ist aber kaum sinnvoll für Moderne Darstellungsformen und deren Möglichkeiten vorbereitet.

Die Klassische Aufteilung in Eingabe und Ausgabebereich mag auch noch heute noch die einfachste Art der Interaktion sein, sie sollte auch wenn möglich nicht gross ändern, denn wenn alles schief geht ist das die einheitliche Bedienkonsole die jeder kennt. Allerdings sagt niemand, dass dies nicht auf modernen Konzepten basieren soll. Es wäre gut wenn sich eine solche Konsole leicht an die Ausgabegeräte anpassen könnte.


{ hacknight challenges }

Eine Variation von https://explainshell.com/ könnte man für die leichtere Fehlersuche einbauen

Integriere Hyper in eine Sammlung aus Linux anwendungen wie z.B. Busybox

  • Ab einer bestimmten DPI könnte auch ein Busybox tiling oder Tabs unterstützen, die z.B. automatisch, kontextabhängig (aktuell laufende Befehle/Programme) Log Informationen anbieten.
  • verschiedene Shell Typen wie sh, bash, dash könnte man als Template-system implementieren.
  • Je nach Fähigkeit der Grafikausgabe könnte die Konsole Video oder Bilder in der Konsole abspielen.

Privacy Butler

Will help you understand privacy notices with visual summaries


~ PITCH ~

Many people are unable to cope with the various privacy notices that we have to deal with on a daily basis. It is important to manage your data and online identity and know how these informations are processed and used. Simply tell Privacy Butler which data processing is a “no go” for you. It converts the privacy notice into icons that show you immediately whether your desired data protection standard is met or not.

Since the project started a month ago at a hackathon, we have been thinking about the idea, and got together at DINAcon to work a bit more on the prototype. See PR 1 and the commits log for details.

We are also interested to get an overview of privacy preferences. If you like, you can fill out the form. If you are interested in the results yourself, you can leave your spam-mail adress in the last question, we will send you the link with the summary results:

Google Form Persönliche Einstellung zum Datenschutz


{ hacknight challenges }

Help us shape the use case and bring your privacy preferences in.
Discuss with us your privacy preferences and how you can help us advance with the project.
Take a look at our Github and see where you can advance the project.
~ README ~

Privacy Butler

Many people like you and I feel that we are unable to cope with all the various privacy notices we have to deal with on a daily basis. Our data is important to us, and indeed defines our online identity.

Your Privacy Butler will help you to understand any privacy notices. Simply tell Privacy Butler which data processing is a “no go” for you. It converts the privacy notice into icons that show you immediately whether your desired data protection standard is met or not.

This project was started at the Swiss Legal Tech 2018 hackathon in Zürich, Switzerland. The original challenge idea can be found here.

Demo

You can see a screencast of the working demo here

Backend

The backend uses Java with Spring Boot 2 and communicates with the Google Cloud Natural Language API. You have to create the credentials yourself in order to be able to communicate with Google Cloud.

Find the backend project files here and instructions to get started in the legal-hackathon-backend folder.

Frontend

The frontend uses Typescript with Angular 6 and Material Design as a styling framework addition to Angular.

You can find the frontend project files and build instructions in legal-hackathon-frontend.

Splash

There is also a static HTML launch page defined in index.html with resources in the web folder. The design template used is HTML5 UP, with jQuery and FontAwesome.

Check the markup for an Easter egg..and a modest proposal on using schema in META tags to publish web site policy in machine readable form. See our reading list below.

Data

We used the Google Cloud Natural Language API in this project for rapid analysis of policy texts. See Quickstart, NL Samples, and Java samples for Google Cloud Platform.

You will need to obtain a developer key from the Cloud API console to use our current backend.

We also ran a short machine learning classification experiment using an open dataset of opt-out policies from usableprivacy.org in the Keras.io deep learning environment. The results can be seen in a Python notebook made with Jupyter, in the ml subfolder.

The dataset used in the experiment above was one of the ones recommended by Pribot.org, a project that was a major motivation for our work here. Many thanks to Dr. Harkous for feedback to our concept during the hackathon.

We also considered using IBM Watson (see Fredrik Stenbeck comparison - and OpenNLP at Apache.

References

Further reading, in no particular order.

Online policy tools

Machine learning

Policy documentation